In the interest of time, we thought of just building the platform for now and the legs later on, so it will make it for Christmas. The platform will be placed on top of a coffee table that we don't use. At the same time, make it upgradeable so that we can add the legs later on.
So off to the nearest Home Depot to buy the following item:
 1. 1"x2" poplar wood - this is to be used for the edge
2. Wood panel (2x4) - about half an inch think so it wont bend. They have pre-cut sizes or you can have them cut it for you.
3. Wood Screws
4. Wood Glue
5. Primer / Green Spray Paint (Flat)
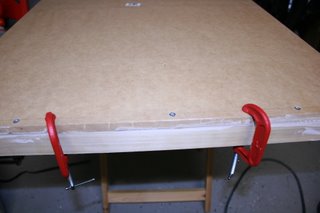
Then off we go to build the train table! I'm so excited for this. I applied glue on the whole length of the poplar wood edges that will attach to the panel board, then clamp them together.

Of course, glue alone will not hold them together. So to make it secure, I screwed them together using wood screws all around the bottom edges. I also screwed the edges from the side to hold them together.
 |
| Update: I do not wear that bracelet anymore, in fact I cut it into pieces. If you believe in God, you rely on God for your health and not some bracelet :) God bless. |
Here are the edges and the wood panel glued and screwed together. One thing to note, is that you might want to drive the head of the screw so that it is flat and flushed to the board. This way the head is not sticking out and it will not damage or cause injury when touched. It will look more professional too! Let the glue dry for a while depending on the type of glue used (e.g. Quick dry, Regular...etc.)
And here it is, all the edges attached to the panel board. We're almost there! Now it's time to paint!

I then covered the edges (on the inside) with painters tape. I'm not gonna paint the edges to preserve the wooden look. I then primed the board and let it dry.
When the primer dried up, I used a dremel tool to smoothen the edges and made them round. This is so that kids won't get injured while they are going nuts with it.

Almost there! This is the table with the board primed and ready to be painted!

Voila! This is the finished product. I used a flat green spray paint, to mimic the ground with grass. The design and possibilities are endless, you can even draw a water area. This table is all ready to be wrapped and ready for Christmas! I am planning to put our handprints in there for a more personalized touch. Total for the materials...about 20 bucks! Even if I add the legs...it won't even come close to $30...I will post another update for the legs.

Update: The smile on my sons face was priceless! All my hard work paid off, just to see them smile like that. This is probably the most fun project I have ever had. I had such a blast being a carpenter and a dad! The table was very sturdy, it feels heavy duty. Next up, the legs for the table!
No comments:
Post a Comment